Filezilla: The server’s certificate is unknown error prevents you from connecting to your server over secure FTP connection.
As now all is moving to https it’s also good to enable SSL/TLS for FTP to protect plain text login credentials.
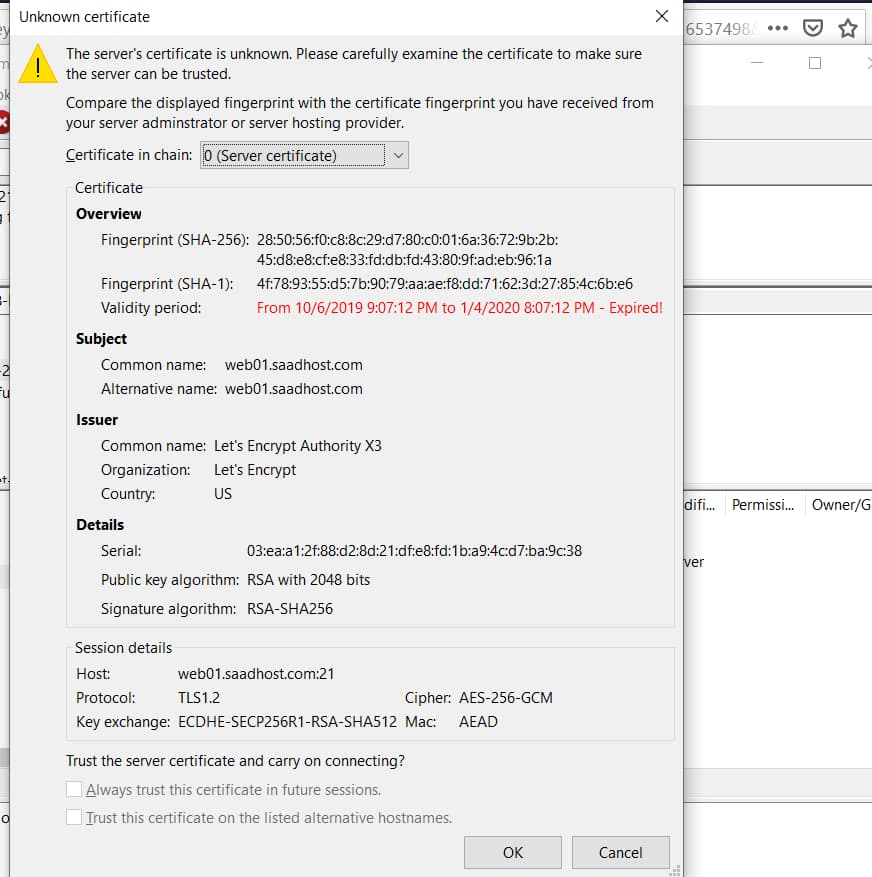
As you can see on the above screenshot, the server SSL certificate seems to be expired, even though we know that this is not the case.
Obviously the FTP server is pulling the the wrong certificate.
Step #1: Find the SSL Server Configuration File
Let’s click on “Status” of the FTP Server:

This is what we see:
● pure-ftpd.service - Pure-FTPd FTP server
   Loaded: loaded (/usr/lib/systemd/system/pure-ftpd.service; enabled; vendor preset: disabled)
   Active: active (running) since Wed 2020-05-27 06:36:17 UTC; 3h 14min ago
  Process: 6686 ExecStart=/usr/sbin/pure-config.pl /etc/pure-ftpd/pure-ftpd.conf --daemonize (code=exited, status=0/SUCCESS)
 Main PID: 6688 (pure-ftpd)
   CGroup: /system.slice/pure-ftpd.service
           └─6688 pure-ftpd (SERVER)
From this wee see that the configuration file is
/etc/pure-ftpd/pure-ftpd.conf
Step #2: Find The SSL Certificate File Used By FTP Server

You can see it on the following line:
/etc/pki/tls/private/hostname.pem
Step #3: Examine The SSL Certificate File
Let’s enter the following date in the SSH Console or Putty:
openssl x509 -enddate -noout -in /etc/pki/tls/private/hostname.pem

As we can see, the certificate contained in this file expired on Jan 4, 2020
This expiration date matches the date shown in red on Filezilla (see featured image of this post).
Step #4: Install SSL for FTP
Our instruction will guide you to install and configure pure-ftpd to use SSL/TLS.
Requirements:
Hostname certificate needs to be already installed, check that these files exist:
/etc/pki/tls/private/hostname.key
/etc/pki/tls/certs/hostname.crt
In this case
- Main SSL folder = /etc/pki/tls/
- Certificate folder = /etc/pki/tls/certs/
- Private key folder = /etc/pki/tls/
Create Certificate File for pure-ftpd
cat /etc/pki/tls/private/hostname.key > /etc/pki/tls/private/hostname.pem
cat /etc/pki/tls/certs/hostname.crt >> /etc/pki/tls/private/hostname.pem
chmod 600 /etc/pki/tls/private/hostname.pem
Warning: Make sure the above paths, file names and extensions are fully correct.
The above commands simply create a hostname.pem file by merging your host’s private key and its certificate.
Then the permission is set to 600.
Step #5: Failed To Retrieve Directory Listing (Explicit FTP over TLS)
Unless you modify your server settings, you will get this error:
Status: Connection established, waiting for welcome message…
Command: USER XXXXXX
Password required for user
Command: PASS *********
Logged on
Status: Connected
Status: Retrieving directory listing…
Command: MLSD
Error: Failed to retrieve directory listing
Therefore the following steps are needed:
Open /etc/pure-ftpd/pure-ftpd.conf…
To to allow FTP and TLS sessions, set TLS to 1:
[...]
# This option can accept three values :
# 0 : disable SSL/TLS encryption layer (default).
# 1 : accept both traditional and encrypted sessions.
# 2 : refuse connections that don't use SSL/TLS security mechanisms,
#     including anonymous sessions.
# Do _not_ uncomment this blindly. Be sure that :
# 1) Your server has been compiled with SSL/TLS support (--with-tls),
# 2) A valid certificate is in place,
# 3) Only compatible clients will log in.

TLS                      1
[...]
Then remove the # in front of the following 2 lines and make sure they point to the right file:
TLSCipherSuite           HIGH
CertFile                 /etc/ssl/private/hostname.pem
Set Passive Port Range in PureFTPD:
# Port range for passive connections - keep it as broad as possible.

PassivePortRange 60000 60100
and save the altered configuration file.
Note: On some servers you may be unable to directly edit the configuration file. In that case download it from the server, edit it in Notepad and re-upload it.
Now configure the firewall to accept incoming connections on CSF firewall.
You can do the following steps:
- Edit /etc/csf/csf.conf and look for the line that begins with: TCP_IN
- add 60000:60100 to TCP_IN section.
- Reload the config in the firewall
You can do it in the CWP CSF Firewall menu:

Step #6: Restart FTP Server
Finally, restart PureFTPd:
systemctl restart pure-ftpd.serviceOr just restart it on your CWP panel.

Step #7: Configuring FileZilla for TLS
In order to use FTP with TLS, you need an FTP client that supports TLS, such as FileZilla or the Firefox FireFTP plugin.
Simply set “Explicit FTP over TLS”.

Filezilla will now see the correct cert:
