When you start your blog, shared hosting works okay. In fact it would be a waste to pay for expensive hosting. When your site start making income, at a certain point it would make sense to upgrade to better hosting where your site doesn’t go down all the time.
This doesn’t need to be expensive, though… I am going to show you how you can get a super fast managed cloud server paying just $40 for 6 months ($80 a year). And you can host as many websites as you can fit into your 25GB storage. (You will need about 3-4 GB for the operating system.)
Note: This post contains affiliate links.
Shared hosting: the hosting provider sets up a powerful server and puts several accounts on it. The exact setup of the server is in your provider’s hands. Some hosts put just 8 accounts on a server, and sell it as “semi-dedicated”. Others put 4,000 accounts on a server, and everything runs really slow. Somewhere in between is a good number that is responsible rather than over-crowded, but does not require them to charge steep rates.
VPS: The hosting provider divides a server into a number of “virtual” servers. You are using a slice of a bigger server, but you get your own RAM and disk space. You need to install your own operating system, software firewall, MySQL server, web server, etc.
VPS divides into “managed” and “unmanaged”. With managed, the host will set it up for you, and install anything else you ask them to, and troubleshoot for you. With unmanaged, you install CentOS, Debian, Ubuntu, etc. out of the box, and then it’s over to you.
Digital Ocean is such an unmanaged VPS provider. That means you have to administer, secure, update and maintain the server yourself. If you don’t have the expertise to do this, you would need to hire someone to do it for you. Or, go for either a managed VPS, or a non-overloaded shared host.
Cloud servers live in huge clusters and consist of multiple physical machines. The storage is central with multiple storage nodes and multiple data copies. Everything in the cloud is redundant and there is no single point of failure. Even if a whole physical machine fails, your cloud VPS will be instantly migrated to another healthy machine in the cluster.
The data center loading speed depends on your location, so you have to choose the data center which is more close to you.
Affordable Fully Managed Servers
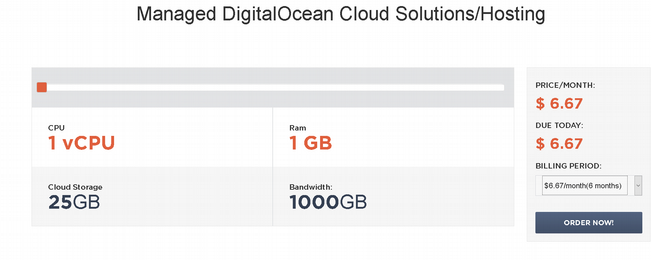
Temok Managed Cloud Hosting includes
- 1 CPU
- 1 GB RAM
- 25 GB SSD storage
It only costs less than $7 per month.

They offer managed support and assist you with setting up and running your instance.
It has the ability to set up WordPress easily and you can set autoSSL to get a free Let’s Encrypt SSL certificate.

First you need to come up with a server name. I registered a separate domain for this, just because I didn’t want to mix things with my existing websites, I prefer a neutral name. (You can easily change your server’s name.)
My server name is web01.saadhost.com. If you use a subdomain server name like this, way you can still use your main domain for building a website and you could even sell hosting on it.
Select your data center (closest to the main location your site serves) and select CentOS as the operating system.
As you can see, I paid $40 for 6 months of cloud hosting. You can use PayPal or credit card and note that they will give you a verification phone call before activating your account.
Your dashboard will look like this:

You can get customer service using a ticket system or chat.

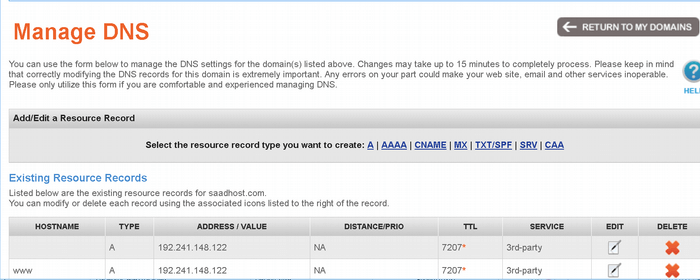
Once your account is active, you would log in to your domain registrar account and point your domain to your server IP by setting an A record:
How To Register Your Own Name Server
Note: This procedure is NOT about assigning a name server to your domain. You register your own brand’s name server that your clients can use.
- Go to your domain registrar and open “Name Servers”.
- Click on “View/Manage Registered NameServers”
- Click on “Register New Name Server”
- Add the subdomain, such as “ns1” and your server’s IP address.
On your CentOS webpanel go to
– DNS Functions –> Edit NameServers IPs
Add here your subdomains you want to use for NameServers and one IP for each nameserver e. g.:
ns1.saadhost.com –> 185.4.149.83
ns1.saadhost.com –> 185.4.149.90
Press “Save and rebuild DNS server”.
You are all set.
Setting Up Your Control Panel
At this point you will need to open a support ticket and ask to set up a control panel (CWP).
If you want to use cPanel, unfortunately that will cost you an additional $16 a month in license fees. Therefore I recommend using CentOS WebPanel. You can check the live demo of the admin panel and the user side also and all the features.
You will have two separate URLs for log-in.
For your admin: https://web01.yourdomain.com:2031
For your users: https://web01.yourdomain.com:2082
These are also available without https and you can look them up under the “Change Host” menu.
This is your dashboard:

After the domain has propagated and CentOS WP is set up, you will get a screen like this when you visit it:

Now you are ready to create a new client account:

The “Package” option you see here is a hosting package, you can assign how much resource you want to give to each account, such as disk space, number of add-on domains, ftp accounts, etc.
You can set automatic SSL for all domains in that user account:

First I created an account for SaadHost.com, however you can also create an account for a fellow blogger and share your hosting expenses, sell hosting or even give it away as a prize.
You may get security warnings, like this – just submit a ticket and Temok support staff will handle it for you:

It is recommended that you ask support to upgrade your PHP to Version 7, then ask them to switch your server to this version.
This is how the client dashboard looks like:

There is a File Manger where your clients can handle the usual functions of uploading files, etc.

Make sure you delete index.html to get rid of the placeholder.
Your next step could be setting up your email under “Email Accounts”, just like you would with any cPanel host.

Now you can log in and test:

Now it’s time to set up WordPress:

Now you visit https://yourdomain.com/wp-admin and finalize your WordPress installation:
